• Skip to main content
  • Skip to primary sidebar
  • Skip to footer
  • Watch Free Demo
  • Login
  • Contact
  • Customer Support

Old Masters Academy

How to paint like the Old Masters using modern materials

  • About
  • Free Demo
  • Art Lessons
    • Personal Tutoring
  • Pricing
  • Community ▾
    • Win Art Course
    • Watch Free Demo
    • Artwork Critique
    • Students Gallery
    • Art Articles
    • Academy Team
    • News
  • Reviews
  • FAQ

Glazing Technique

Art Lesson 31, Part 8

In this lesson, you will discover a Glazing Technique

Learn how to paint like the Old Masters!

Old Masters Academy Online Course
Self-study, self-paced online video course

Lifetime membership
One-time payment: $487

Enroll Now!
Personal Tutoring online + Online Course
Unlimited tutoring by the Academy teachers

Lifetime membership
One-time payment: $997

Enroll Now!


« Back to the Art Lessons List

Glazing Technique

Let’s do quick Glazes over our already dried cold and light Underglazing.

Glazing Technique

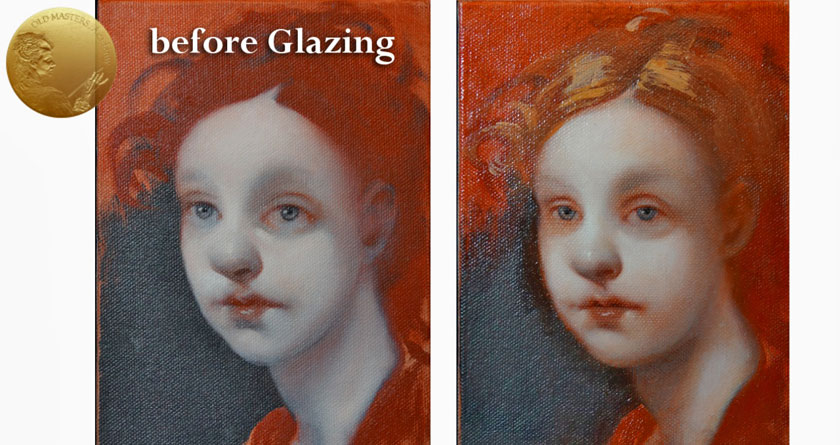
First of all, we mix Red and Yellow with the Glazing Medium. As a Glazing Medium, we have, as always, Stand Linseed Oil. We cover the whole face and neck area with a thin film of this Glaze. When the Glaze is distributed, we take a clean Hog Brush and work with it over the Glaze, thinning the layer and spreading the paint evenly.

The subtle film of warm Glaze appeared over the cold Underglazing and unified the painting. The cold lower layers are still visible through the upper Glaze, which makes the paint surface more complex.

After that, we will proceed with glazing a background. For the task, we use Scarlet Lake, diluted with Stand Oil. It’s enough to use just a thin transparent layer of Scarlet Lake to increase the luminosity of the red background. That’s the power of the Glazing method.

And at the end – it’s enough to add just a few loose strokes to indicate the highlights of the hair.

We are done with the Glazings in this exercise. In this exercise, I didn’t have time to make multiple Glazes and decided to make them in one go. That’s why they look quite rough. However, we have to take note that the glazing should be done in multiple thin layers. We have to wait till each film dries before we apply the next one.


Learn how to paint like the Old Masters!

Old Masters Academy Online Course
Self-study, self-paced online video course

Lifetime membership
One-time payment: $487

Enroll Now!
Personal Tutoring online + Online Course
Unlimited tutoring by the Academy teachers

Lifetime membership
One-time payment: $997

Enroll Now!

Primary Sidebar

Search Website

Members Area

You are not currently logged in.


» Lost your Password?

Watch Free Demo

Old Masters Academy

Art Course

» Personal Tutoring
» Art Lessons
» Free Demo
» Enroll in the Course

Art Community

» Win Art Course
» Art Competition Winners
» Art Competition Archive
» Artwork Critique
» Students Gallery
» Art Articles
» Academy Team
» News

Course Tutor

» Natalie Richy

Fine Art Resources

Watercolor Academy - How to paint in watercolor Life Drawing Academy - How to draw figures and portraits Drawing Academy Anatomy Master Class Art-Fame

Footer

Watercolor Academy

Art Lessons

About Old Masters Academy™
Art Lessons
Personal Tutoring
Free Demo
Old Masters Academy Pricing

Life Drawing Academy

Discover

Art Competition
Old Masters Academy FAQ
Old Masters Academy Reviews
Old Masters Academy News
Fine Art Resources

Drawing Academy

Support & Legal

Contact
Customer Support
Privacy Policy
Terms of Use and Service
Sales & Refund Policy

Anatomy Master Class

Students Area

Members Login
Artwork Critique
Students Gallery
Old Masters Academy Community
Old Masters Academy Team

© 2007-2023 · Old Masters Academy · All rights reserved.