Art Lesson 41, Part 7
Discover how to Oil Paint a Female Portrait in Profile
Learn how to paint like the Old Masters!
Old Masters Academy Online Course
Self-study, self-paced online video courseLifetime membershipOne-time payment: $487Enroll Now!Personal Tutoring online + Online Course
Unlimited tutoring by the Academy teachersLifetime membershipOne-time payment: $997Enroll Now!« Back to the Art Lessons List
How to Oil Paint a Female Portrait in Profile
Session Seven
By this time, the canvas surface is dry and we can continue painting the figure. Once again, we prepare a mix of Titanium White with Yellow Ochre without any Medium.
This paint mix is used to increase the thickness and volume of the paint layers. With time, some oil paints become more transparent so, it is a good idea to cover the area with extra layers of paint to prevent inevitable partial transparency in the upper layers. This way, we will ensure that the old design will not become visible after many years. The denser the layers of paint, the more protected the painting will be from deterioration and exposure of the lower layers.
We also increase the density of the Underpainting over the figure, including the face. There is still a big contrast between the lighted areas of the face and face features painted in a dark brownish color. To minimise this contrast, we apply a thin coat of a White and Yellow Ochre mix over the shaded areas. The dark paint is still visible through, but we achieve the visual effect of a cool tone in dark areas (in the region of the eyelids and nostrils).
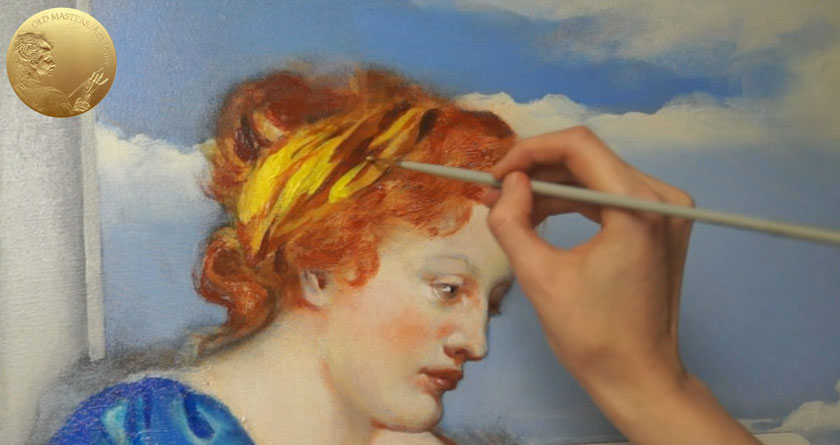
I have decided that the forehead of the model should be more exposed. For this, I overlay the hair with a skin mix. The process of finding a better shape is still in progress. A few touches of the same mix will make the iris lighter.
Let’s come back to the hair and headband painting. We take pure Yellow Lake thinned with Stand Linseed Oil and glaze over the headband.
Now we admix Burnt Umber to Yellow Lake and paint the shadows of the folds and hair. The area of forehead is wet, and paint integrates well into the skin mix. Once we feel enough has been done during this session, the painting can be put aside for drying. Alternatively, work can be continued on other parts of the painting.
Session Eight
We proceed with the next session once the surface of the canvas has dried. This is pure, unthinned Titanium White. We are going to cover the skin on the face with this semi-opaque Glaze. As you remember, this method of Glaze is called Velatura.
When doing light velatura over dark areas, you can achieve a cool marble look. However, applying this velatura over lights results in an increase in thickness, which is also what we intend to do.
The most highlighted areas also can be increased in lighter tone and thickness. We apply Titanium White in its unthinned state, straight from the tube. This allows us to make relatively thick strokes of paint.
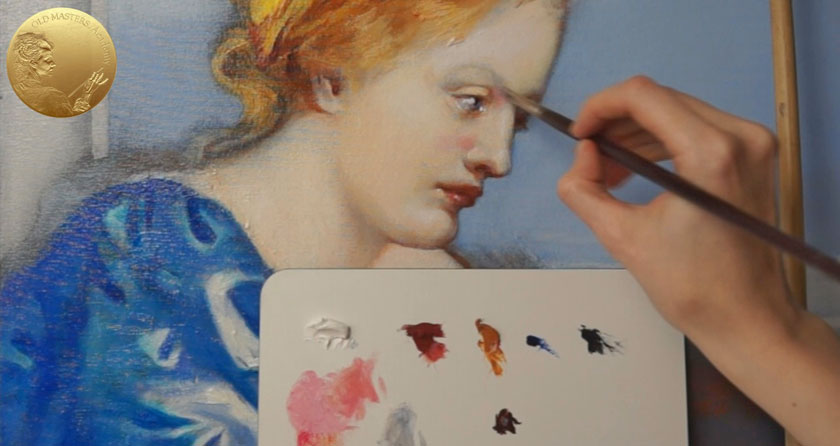
We also need to work on tonal nuances. For this, we admix Charcoal Grey with Titanium White. This grayish mix works great for mid-tones. Because it is still an Underpainting, it’s perfectly ok to use a combination of simple and not so picturesque colors. When the Underpainting dries, we will continue with more colorful glazes on top. The grayish mix easily blends with white Velatura that is recently applied.
Now, let’s add more colors to the face. We thin Burnt Sienna with Stand Linseed Oil and apply the paint in a transparent layer. The colour is a bit exaggerated. Although it is more saturated than in nature, our intention is to add vividness and picturesqueness to the painting. Such methods were often used by the Old Masters, especially by Rubens. Such colors are added intuitively, but we also need to pay attention to how these vivid tints work from the color theory point of view. In this particular case, the red-orange passages work with blue sky as complimentary colors. Such opposite colours, when placed together, reinforce each other.
Session Nine
It is time to continue the painting with another session. By now, the surface is completely dry. We prepare a simple mix of Burnt Sienna and Yellow Ochre thinned with Stand Linseed Oil. This Glaze is applied over the entire face and over all open body parts. For better transparecy, the paint should be sufficiently thinned with a Medium. The amount of Medium can be varied, depending on the degree of transparency you want to achieve.

While the Glaze is still viscous, we can paint white highlights, integrating them into the wet Glaze. For this, we use pure Titanium White without any Medium added. As you can see, the paint smoothly integrates into the wet layer of Glaze, creating very smooth transitions between tonal nuances. After that, we put the painting aside to dry.
Session Ten
In general, the portrait is almost completed; however, there are many small details I want to work on. Once again, the simple approach with minimal materials will be used – we take Titanium White and thin it with a small amount of Stand Linseed Oil.
Using this white paint, we place the highlights in the eyes and also reinforce the lightened areas on the forehead, cheekbone, and chin. Any soft brush would be great for this task; you can also spread the paint with your finger.
The color nuances of the face can also be enhanced. For this purpose, we prepare a mix of Titanium White, Yellow Ochre, Venetian Red and some bright red: for example, Scarlet Lake. Check if the mix is suitable in color and viscosity and adjust the tint if necessary. Because this paint will be applied as a semi-opaque layer, a bit of Stand Linseed Oil can be added to thin the mix.
These adjustments also play a decorative role. They can be exaggerated to achieve a more picturesque effect, as we do not strive for a naturalistic depiction. That’s the power of visual art over a mundane “real” life. Apply the paint in small quantities and spread it using a soft brush or your fingers.
For the next step, we can add to the pinkish mix a bit more of Venetian Red and play around with all these hot nuances. In the course of the painting, we overpainted the highlights on the lower lid and reflections in the iris, so now we place them again.
Let’s go back to the hairstyle. We can leave everything as is, or continue experimenting with colors and shapes even further. We mix Burnt Sienna and a bit of Charcoal Grey. Then the tint is mixed with Stand Linseed Oil, richly thinned with Turpentine, to achieve a flowy condition.
Now, it is time to answer one of the most asked questions – at what moment should we consider our painting finished and when should we stop painting? In theory, you can paint indefinitely. There will be always something that you are not really satisfied with and want to improve. However, in practice, it is better to stop working just before you think the painting is finished because overdoing is worse than underdoing things… at least this way, you leave something for the viewer’s imagination to complete. At the very moment you decide that the passage looks good, do not touch it any further, at least in a radical way. You can add fine Glazes, that will not change the build up arrangement, but would just add extra nuances in color.
We reinforce the yellow color of the headband by applying a pure, unthinned Yellow Lake. And do final decorative touches here and there. After this, we set the painting aside to dry.
Session Eleven
When the surface is absolutely dry, we proceed with painting the figure. We are going to cover the body of the allegorical figure with a semi transparent veil.
For this task, we use pure white paint, thinned with Stand Oil (preferably Walnut Oil). Zinc White has less covering power than Titanium White and is more suitable for very transparent glazes. However, if you only have Titanium white, that’s ok, just add more Medium to it. This opaque Glaze can be applied in thin coats all over the body, but in folds, we apply the paint with thick brushstrokes. By admixing a bit of Charcoal Grey, the tint gets a grayish tone. This darker mix can be placed in areas where shadows from the folds fall onto the body.
The veil feels light and crispy. You can play with white paint and fine-tune the characteristics of the folds. Make sure to apply the paint layer very thinly, so the model’s body will show through the veil’s fabric. Here’s the speed demonstration to recap how the figure and portrait were painted.