Art Lesson 41, Part 1
How to do Underdrawing with a Brush
Learn how to paint like the Old Masters!
Old Masters Academy Online Course
Self-study, self-paced online video courseLifetime membershipOne-time payment: $487Enroll Now!Personal Tutoring online + Online Course
Unlimited tutoring by the Academy teachersLifetime membershipOne-time payment: $997Enroll Now!« Back to the Art Lessons List
Underdrawing with a Brush
Materials:
Pre-stretched ready-primed canvas. Nails and thread
Turpentine and Stand Linseed Oil
Brushes:
- Hog brushes
- Sable or Mongoose or Badger Brushes
- Soft Synthetic Brushes
Paints:
- Titanium White
- Zinc White
- Yellow Lake
- Indian Yellow (optional)
- Scarlet Lake
- Scheveningen Red Deep or other bright Red, (preferably transparent)
- Burnt Umber
- Burnt Sienna
- Venetian Red
- Yellow Ochre
- Transparent Gold Ochre
- Ultramarine Blue
- Phtalocyanine Blue (optional)
- Charcoal Grey
- Mars Black
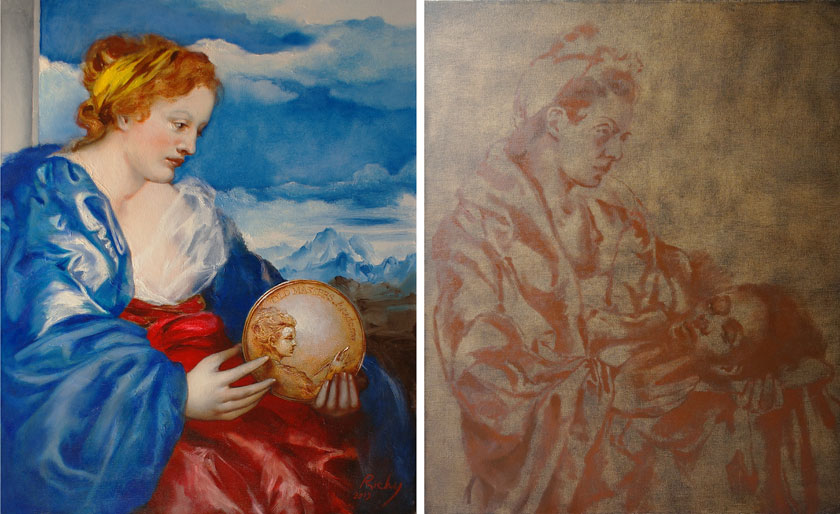
This is what the completed painting looks like. In the next couple minutes, you will see a fast-forwarded clip which shows how this painting was created. Shortly afterwards, the painting process will be explained in detail, step by step.
This artwork begins from preparatory sketches. The composition was conceptualised in small-scale drawings made with sanguine and charcoal on paper.

We prepare a piece of tracing paper. The size of this paper should have the same proportions as the canvas on which we will paint this composition. You can use the “Proportion Calculator” to figure out the required dimensions. Here, you can see that the drawing has the same proportions as the canvas.
We place and fix the tracing paper over the sketch. Now we draw guidelines which will be used to transfer the composition to our canvas. You can draw diagonal or squared guidelines.
The canvas needs to have the same pattern of guidelines. Use small nails – slightly drive them into a wooden stretcher in key points. Then pull the thread, according to the pattern of the guidelines on your sketch.
The canvas has already been coated with the layer of Imprimatura. For this layer, we mixed Burnt Umber thinned with Turpentine and applied it on our canvas unevenly.
Session One
Painting begins with a very limited color palette. In this case, we use the Titian Palette. There are only a few colors, namely Venetian Red, Mars Black and Titanium White. All are opaque paints, which is exactly what we need for an Underpainting.
We start with a Brush Sketch over a well-dried Imprimatura. Keep in mind that the Imprimatura should be well dried, otherwise you can wipe it off to get a white canvas. Venetian Red and Mars Black are mixed for a Brush Sketch. No medium is added to this mix. Hog brushes are well-suited for this purpose.
At first, we outline a figure quite sketchily. Small and larger size brushes can be used for blocking in areas of the Brush Sketch.
While the paint is still wet, it is possible to fix any mistakes, if required, by wiping paint off to Imprimatura and painting over again.
Gradually, the composition is taking shape. At this step, we do not need small details, just key features of the figures.
Soft Synthetic Brushes are handy for details. Draperies and hands are also painted schematically. The initial composition, as you can see, differs from the final result in some places. One of the most notable changes is the very subject of the composition, which was “Salome”; that I redesigned later for a less dramatic “Allegory of Painting”.
That’s why we won’t pay much attention to the second portrait, which will soon be overpainted.
After you sketchily outline your figures, you can remove the guideline thread. The thread can be cleaned up with a piece of tissue or cloth. It can be reused later on.
Remove the nails… they also can be reused. Now, without the guidelines, you can clearly see what needs to be fine-tuned.