Art Lesson 44, Part 5
Discover how to paint a Figure with a still-life in Oils
Learn how to paint like the Old Masters!
Old Masters Academy Online Course
Self-study, self-paced online video courseLifetime membershipOne-time payment: $487Enroll Now!Personal Tutoring online + Online Course
Unlimited tutoring by the Academy teachersLifetime membershipOne-time payment: $997Enroll Now!« Back to the Art Lessons List
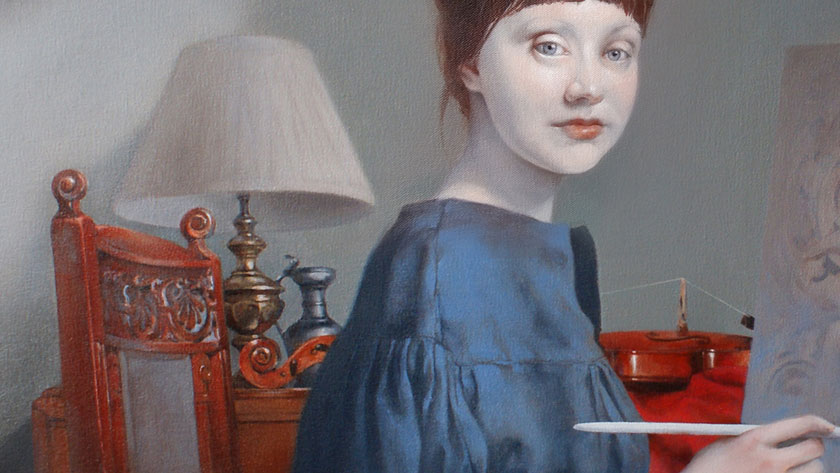
How to Paint Wooden Textures in Oil Painting
The red wooden chair has some carved decoration. It’s already painted in brown under-painting and now can be continued in a slightly different technique than metal objects. As you remember, metal objects were painted from dark to light; the chair can be worked from light to dark. There are no specific rules about what method to use in any particular case or for any particular material. However, for educational purposes it’s a good practice to try a variety of methods to decide which works better for you.
The draft under-painting is now being highlighted in light colors to accurately shape all the curved parts of the chair’s back. Pick any warm earth color and mix it with white paint. There’s no reason to worry about matching the color of the highlight precisely, as later we will apply glazing and correct colors as required. However, make sure you are making lights a bit lighter than they normally are. The glazing will darken original colors. The same rule applies for mid-tones and shadows. If you plan to finish some parts of the painting using the glazing technique, keep colors and tones a bit brighter and lighter than you would like the end result to be.
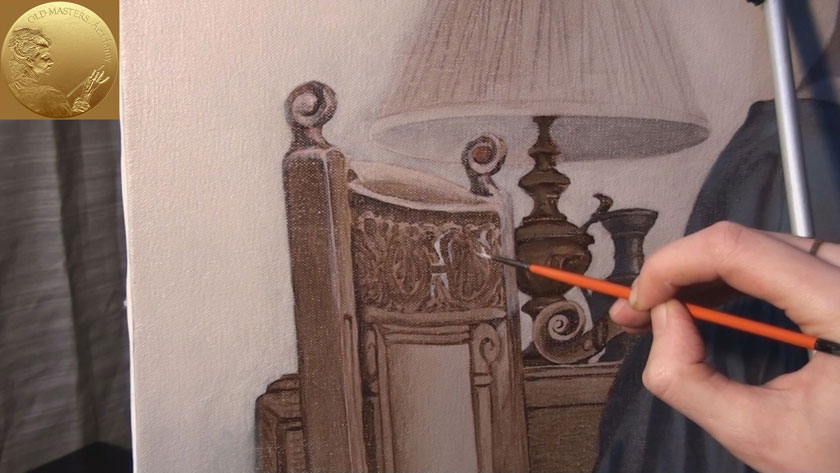
When light areas are done, you can continue with darker tones and gradually work into the shadows. There are two ways to do shadows – the first is to use opaque paints and the second is to use semi-transparent or semi-opaque paints. Using semi-opaque or transparent paint will give you an optical mix of top colors with underlying tones and color from the under-painting. However, in multi-layer painting a great number of transparent layers will darken the picture.
When the chair’s lights and shadows are done and the paint is dry (which might take some time depending on the medium used and the drying conditions), we can continue with glazing. Always make sure that the previous layer is completely dry before applying the next glazing layer. For the wooden chair we are doing semi-glazing with a very thin layer of Caput Mortuum mixed with Burned Sienna and diluted with Liquin Original. Strictly speaking this isn’t a glazing paint; however, by applying the mixture very thinly we will achieve the desired effect of a cloudy surface, which is suitable for wooden objects. It’s always a good idea to test which colors would be the best choice for particular task on a small area of the painting first.
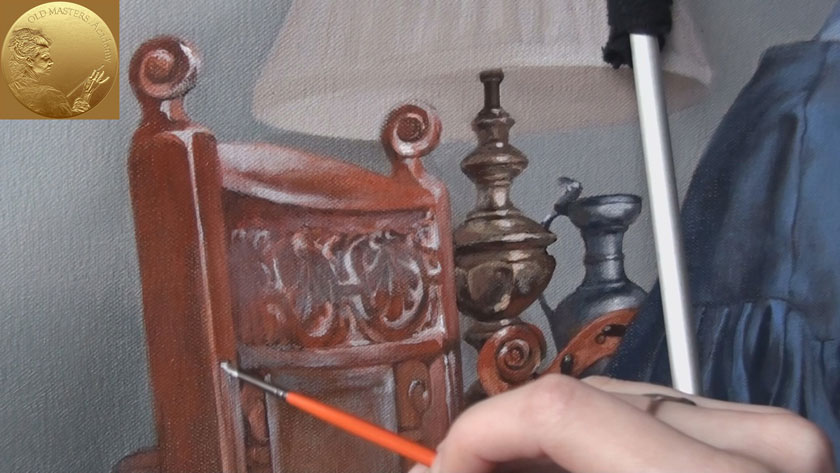
When the glazing paint mix is prepared we can glaze the whole chair in the same color, thus unifying it as one object. After that you can do some finishing touches like cold colors for carved decoration, highlighting the details using a small round brush.