• Skip to main content
  • Skip to primary sidebar
  • Skip to footer
  • Watch Free Demo
  • Login
  • Contact
  • Customer Support

Old Masters Academy

How to paint like the Old Masters using modern materials

  • About
  • Free Demo
  • Art Lessons
    • Personal Tutoring
  • Pricing
  • Community ▾
    • Win Art Course
    • Watch Free Demo
    • Artwork Critique
    • Students Gallery
    • Art Articles
    • Academy Team
    • News
  • Reviews
  • FAQ

How to Finish an Oil Painting

Art Lesson 32, Part 5

Discover How to Finish an Oil Painting

Learn how to paint like the Old Masters!

Old Masters Academy Online Course
Self-study, self-paced online video course

Lifetime membership
One-time payment: $487

Enroll Now!
Personal Tutoring online + Online Course
Unlimited tutoring by the Academy teachers

Lifetime membership
One-time payment: $997

Enroll Now!


« Back to the Art Lessons List

How to Finish an Oil Painting

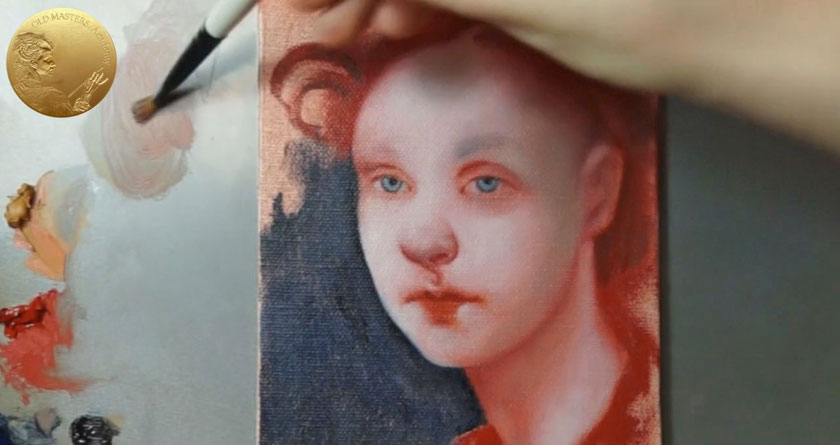
This is how our Color Underpainting looks. Now, we are going to finish it in more detail.

For now, the portrait looks too flat, so we are going to pay more attention to the shades, to make them more visible – that makes the portrait more volumetric. We need to add Yellow and a tiny-tiny bit of Black to the White Color; we also add Stand Linseed Oil diluted in Turpentine, so we have a quite flexible and flowy consistency of paint. We create a colorful shade.

We add even more of the Glazing Medium and paint over the Red Underpainting in the shadow area. We can add more Red to make the Velaturas warmer and a bit darker.

At this stage, the lower lip looks darker then we need it to. Let’s modify it. We mix White, Red and Yellow and apply them opaquely over a dark Underpainting.

We can apply another opaque layer of skin color over a dry Underpainting to increase the volume of the paint surface. And at the end, we highlight all lightened places of the face – on the nose and lips, with separate brush strokes; but we spread our highlight on the cheeks and forehead.

How to Finish an Oil Painting

That is it. We have finished our exercise. This short, two-session method can be continued by adding more Glazing and Velatura layers. In that case, it would be a bit different of a method, another variation.


Learn how to paint like the Old Masters!

Old Masters Academy Online Course
Self-study, self-paced online video course

Lifetime membership
One-time payment: $487

Enroll Now!
Personal Tutoring online + Online Course
Unlimited tutoring by the Academy teachers

Lifetime membership
One-time payment: $997

Enroll Now!

Primary Sidebar

Search Website

Members Area

You are not currently logged in.


» Lost your Password?

Watch Free Demo

Old Masters Academy

Art Course

» Personal Tutoring
» Art Lessons
» Free Demo
» Enroll in the Course

Art Community

» Win Art Course
» Art Competition Winners
» Art Competition Archive
» Artwork Critique
» Students Gallery
» Art Articles
» Academy Team
» News

Course Tutor

» Natalie Richy

Fine Art Resources

Watercolor Academy - How to paint in watercolor Life Drawing Academy - How to draw figures and portraits Drawing Academy Anatomy Master Class Art-Fame

Footer

Watercolor Academy

Art Lessons

About Old Masters Academy™
Art Lessons
Personal Tutoring
Free Demo
Old Masters Academy Pricing

Life Drawing Academy

Discover

Art Competition
Old Masters Academy FAQ
Old Masters Academy Reviews
Old Masters Academy News
Fine Art Resources

Drawing Academy

Support & Legal

Contact
Customer Support
Privacy Policy
Terms of Use and Service
Sales & Refund Policy

Anatomy Master Class

Students Area

Members Login
Artwork Critique
Students Gallery
Old Masters Academy Community
Old Masters Academy Team

© 2007-2023 · Old Masters Academy · All rights reserved.