Art Lesson 24
In this lesson, you will discover How to Mix Black and Brown Colors
Learn how to paint like the Old Masters!
Old Masters Academy Online Course
Self-study, self-paced online video courseLifetime membershipOne-time payment: $487Enroll Now!Personal Tutoring online + Online Course
Unlimited tutoring by the Academy teachersLifetime membershipOne-time payment: $997Enroll Now!« Back to the Art Lessons List
How to Mix Black and Brown Colors
In the previous Video Lesson, we promised to show you Tertiary Colors. Now, we will see how to mix your own Tertiary Colors as Browns, Greys and Blacks using Primary and Secondary Colors.
Tertiary Colors are formed by mixing Primaries and Secondaries in different combinations.
Let’s see what to mix in order to achieve a completely different category of Colors. And after that, we will discuss what we have achieved and what kind of conclusions we can make from that.
So, we need Worksheet #14; here it is. We outline the guidelines on the support. In our case, it’s an Unstretched Canvas, and we use Masking Tape to seal the areas we want to keep untouched. Also, we can make temporary tags over the Masking Tape.
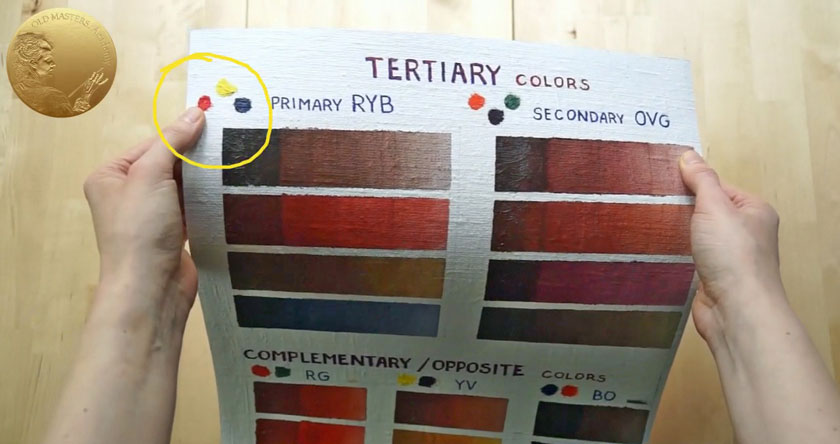
Squeeze three Primary Colors on your Palette – these are Red, Yellow and Blue Colors. Place a little sample of each Primary Color above the Chart. We will always know how the original Colors that we are going to mix look when they are straight from the tube.
Now, we mix three Primary Colors – Yellow, Red and Blue, in more or less equal proportions. We apply the mixed Color on the Canvas as we usually do – starting with thickly applied strokes, then gradually reducing the thick coat of Paint to a very thin film, to see how the Paint looks in thick and thin layers. To better understand the visual qualities of this mix, we apply a glaze layer, too. For that, we use Liquin as a Glazing Medium.
We apply the thinned Paint with a Brush, then smooth out the layer with a flat soft Brush.
Then, we divide the remaining Paint mix into three parts and add to each part of mixed Paint the same amount of each Primary Color. As a result, we have three more mixes of Red, Yellow and Blue. But now, they are mixed in different proportions: here, Red will dominate over Yellow and Blue. In this sample, Yellow is a dominating Color, and in the last sample, the Blue Color is a dominant Color. We apply all mixes in the same way we applied the first sample – a thin coat of Paint first, then a Glazing layer.
The next part is dedicated to mixing Tertiary Colors from Secondaries. We have to prepare them on our Palette first. As we remember, the Secondary Colors originate from mixing two Primary Colors. We mix Yellow and Red to create Orange; Yellow and Blue to make Green. When we mix Blue and Red Oil Paints, it’s practically impossible to get a Violet Color, which, in theory, should appear. On practice, we can achieve a very Dark, near Black Color with a hint of Violet. As an alternative, you can use any Violet from the tube for this exercise.
Well, we do everything as we did with the Primary Colors – we place a small dab of each Secondary Color above the Chart. Then, we take equal amounts of each Secondary Color and intermix them evenly into one Color; then, apply as usual – thinly first, then in the form of Glazing. Next step – we divide this mix into three parts and add to each part the same amount of each Secondary Color. We will end up with three new mixes. In one mix, the Orange is a dominant Color; Violet comes in second; and finally, in the third mix, Green is the dominating Color. We apply them as always.
Now, it’s time find out what kind of Colors can we get by mixing Opposite Colors. As Opposite or Complementary Colors, we call a pair of Primary and Secondary Colors that is located just opposite of them (non-adjacent Secondary Color).
Let’s place the samples of Primary Colors first – Red, Yellow and Blue. Then, place their Opposites: Green to Red, then goes Violet next to Yellow, and Orange to Blue. We mix the two Opposites Red and Green together in equal parts and apply them to the Canvas, reducing the thickness of the layer from Impasto to a Glazing. After that, we have to mix the same Opposites, but in different proportions – in one, Red predominates over Green; in another sample, Green is bigger in proportion to Red.
Our next Opposite Colors are Yellow and Violet. First goes the mix of Yellow and Violet in equal parts. Then, Yellow dominates the mix; and in this part, Violet dominates. Then, follow with Blue and Orange, Opposite Colors. And we repeat the procedure as for previous Opposites – equal parts; dominate Blue; dominate Orange.
The time has passed, the glazed layers are dry.
After that, we can remove the Masking tape, revealing the Canvas between samples of Colors. It takes quite a lot of time for all swatches to become dry because Paint in Impasto layers takes longer than glazed layers thinned with fast drying Liquin. When the Paint is touch-dry, we will write all of the identifications. This is how the completed Swatches look.
Now, let’s analyze what we can see here. All Tertiary Colors we see here are made using these three Primary Colors. Depending on what kind of Primaries you choose, the result Colors (the Tertiary Colors) could vary from Reddish Brown to near Black.
Let’s have a look at what we got by mixing all Primary Colors in equal proportions: they cancel each other out, creating a pleasant Brown Color. When we mixed all Secondary Colors in equal proportions, we created the same kind of Brown Color. Why is that? Because Secondaries are derived from Primary Colors, so it’s literally the same mix together of Primaries. By varying the proportions of Colors in the mix, we have the result of different nuances of Brown.
Mixing Opposites in equal quantities also creates Brown Colors. But we understand that Opposite Colors contain one Primary and one Secondary Color that is made by mixing two other Primaries; so, Opposite Colors also contain all three Primaries.
Maybe it sounds a bit confusing, but once you got it, you will look at it as an ingenious simplicity. Yes, it is ingenious indeed – all these Tertiary Colors, as we see on this Chart, contain just these three Primary Colors – Red, Yellow and Blue.
For example, let’s analyze which Primaries are in this brilliant Tertiary Color that looks so very much like Yellow Ochre. Let’s disassemble this mix into Primary components:
We need Yellow and a Violet Color that contains equal parts of Red and Blue. We mix them together. Then, we take this mix and add the same quantity of Yellow to it. So, what does this mix contain? One part of Red, one part of Blue and six parts of Yellow. All Primary Colors.
The next one – a dominating Violet over Yellow – also has a combination of all three Primary Colors, but in different proportions.
As you can appreciate, when we know how Colors work, it’s possible to create rich and colorful artworks having just these three Primary Colors. Even when they are pretty dark when applied thinly, we can effectively use them in Glazings. Just look at the variety – Blue, Yellow, Red, Purple, nuances of Brown Colors. I’m so excited when I see all this brilliance!
So, make your own tests, and keep them at your side for reference. Color Theory and Colors potential is so important that you will discover new combinations of Colors through all your creative life.
What you need for the task:
- Worksheet #14
- Prepared Support – Canvas, Canvas Board or Oil Painting Paper A3
- Masking tape
- Any Yellow, Red and Blue Colors
- Hog or/and Synthetic Brushes + Wide Flat Synthetic Brush for smoothing
- Palette Knife
- Liquin Original