Art Lesson 15
In this lesson, you will discover Titian’s Painting Technique – Glazing
Learn how to paint like the Old Masters!
Old Masters Academy Online Course
Self-study, self-paced online video courseLifetime membershipOne-time payment: $487Enroll Now!Personal Tutoring online + Online Course
Unlimited tutoring by the Academy teachersLifetime membershipOne-time payment: $997Enroll Now!« Back to the Art Lessons List
Titian’s Painting Technique – Glazing
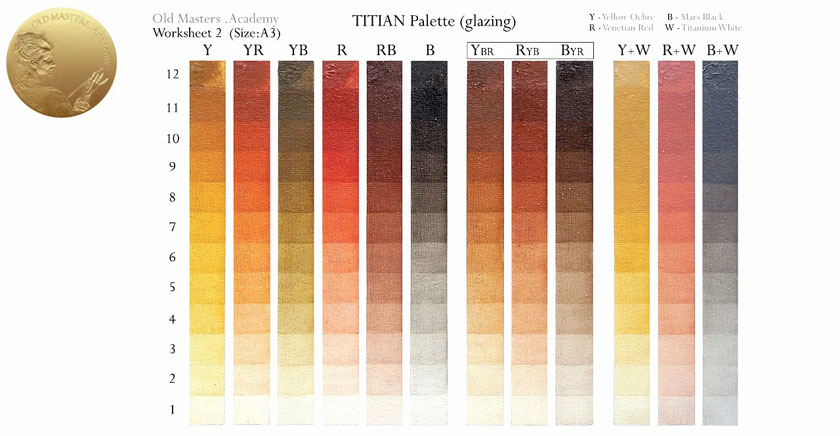
We will continue to discover Old Masters Palette. This is another Video Lesson dedicated to the Limited Palette of Titian. We have already created the first color chart of Titian’s Palette of opaque Paints, used for Underpainting. Now, we are about to explore the same Titian’s Palette, only applying the paint in very thin, transparent Glazes. This Titian Painting Technique is known as “Glazing technique” and has been vastly admired for five centuries already. These two examples – with thickly applied Paint and transparent Glazing create different qualities of paint layers. We will analyze the differences at the end of our Video Lesson.

For now, let’s see what materials we need to have in order to make such Glazing chart. We need to print out Worksheet #2 for guidelines. After we prepare our support, which was demonstrated in one of our previous Video Lessons, we can cover the ground with an additional layer of White. This is optional but could be advisable if your support ground is a bit off-white or if you are doing the exercise on canvas and want to have an Underpainting layer to add additional thickness to the canvas surface. This additional layer of white ground also helps to reveal the whole abilities of Glazings. If your support is absolutely white, like in the case of choosing oil painting paper as your support, you can skip this step.
For those who decided to apply an extra layer of Titanium White, as I’m doing now, I have to warn you – we have to wait at least 10 days before proceeding with the Glazing because the paint itself (Titanium White) is a slow drying pigment so we have to wait longer than average till it dries properly. It’s essential to apply glazes over a completely dry surface to prevent the Glazing layer from mixing with the lower layer.
Alternatively, you can apply an extra coat of a Primer, which will be ready to be glazed over in just a few hours.
Here, you see our Underpaining Colors chart that we completed in a previous Video Lesson, and below is a support, already dried, completely prepared for Glazing exercises. For creating transparent layers of glazes, we need a Medium to thin the paint. There are a number or mediums we could choose from, but we decided that Liquin Original will do the job better than other alternatives. It speeds up the drying time, which is essential as we are going to build up to 12 layers of thin glazes. Each layer after that should be applied on dried previous one.

We continue with Titian’s limited palette, so we are going to use the same Hues (Colors) and color mixes as in the previous exercise. Look at the indications for Colors here in the Opaque Palette and in the Glazing Palette – they are identical: pure Yellow, Red and Black; mixes of Yellow-Red, Yellow-Black and Red-Black; and three color mixes with one of the colors dominating the others – Yellow-Black-and-Red, Red-Yellow-and-Black, and Black-Yellow-and-Red. Only the final group is different – if the previous groups were done in transparent glazing layers, this group is done in cloudy, semi-transparent glazes, called “Velaturas.” Each of the pure Yellow, Red and Black colors were tinted with White, in equal parts, and then applied layer by layer. Coming back to the process: we are generously diluting Yellow in Liquin Original and filling in the whole column with the first layer of transparent glaze.
Glazed layers are similar to watercolor layers, when the white paper shines through the thin watercolor layer. The only difference between watercolor painting and oil Glazing is the medium used – watercolors are water diluted paints, while Oil Painting Glazes are made by adding some special glazing medium into the paint.
The Glazing layer appears to be covered unevenly, we are smoothing the layer by using a clean wide brush and distributing the paint evenly by moving the brush in one direction from right to the left, periodically wiping off extra paint from the brush. In this way we have created the first layer of Yellow Glaze. As you can see, it corresponds with the first column of the Opaque chart.
Now, we are going to indicate where we will place Red and Black swathes. It’s time to proceed with the following Hue – with a Red column. We are diluting Red with Liquin as we just did for Yellow. Try the paint; if it is too diluted, add a bit more Color or more Medium if the Value is too dark. Smooth the paint with a wide brush as we did beforehand.
When we have completed the first layer of glazing in Red, we can proceed with the Black Color – the Black Hue. We already know the work-flow – we apply the diluted paint to our support. Then, we smooth out the layer with a clean wide brush. And in such way we are proceeding to fill in the remaining columns containing the following Hues that we listed beforehand: pure Yellow, Red and Black; mixes of Yellow-Red, Yellow-Black and Red-Black; and three color mixes with one of the colors as the dominating color – Yellow-Black-and-Red, Red-Yellow-and-Black, and Black-Yellow-and-Red. And finally, the last group of semi-transparent glazes: Yellow-White – pure Yellow that is tinted with White, in equal parts; Red-White – half Red, half White and Black-White, also tinted in equal parts.
Such thin glazes, made with Liquine, dry very fast. They are already touch-dry by the next day; however, I would recommend waiting at least three days to let them dry throughout. If the glaze layer is not properly dried, the next layer can wash it off. OK, when our glazing is completely dry, we will draw slightly visible guidelines with equal intervals – these lines divide the column into 12 equal parts. These are going to be our 12 steps – 12 layers of Glazes, one over another.
Let’s fill in the very upper row with a thick portion of opaque paint. This will serve as a tuning-fork. Later, when we complete the chart, we will be able to compare the difference between the opaque layer of paint applied in one go, as we have now, and in the sequence of 11 glaze layers.
Now, we will continue building up gazing layers – this is our second layer. The process is the usual one, as we did by applying the first glaze, only now we leave the bottom row untouched – this is our first step and should be left as a demonstration. All other squares are to be filled in and smoothed over for a better look.
This process is applicable for all other colors. We will use the same process to make layers 1, 2, 3, 4, 5… and so on till the 11th step. We will make 11 glazes in total. This 11th step is pretty much the maximum of what is possible to get from the glazing technique.
If you decide to apply more glazes to the top, not much change will occur. We have reached the maximum. Of course, we could make fewer steps to create the Value from the lightest to the Darkest Value, not 11, but 7, for instance; in such case, we just need to create more opaque layers by diluting the paint in smaller proportions.
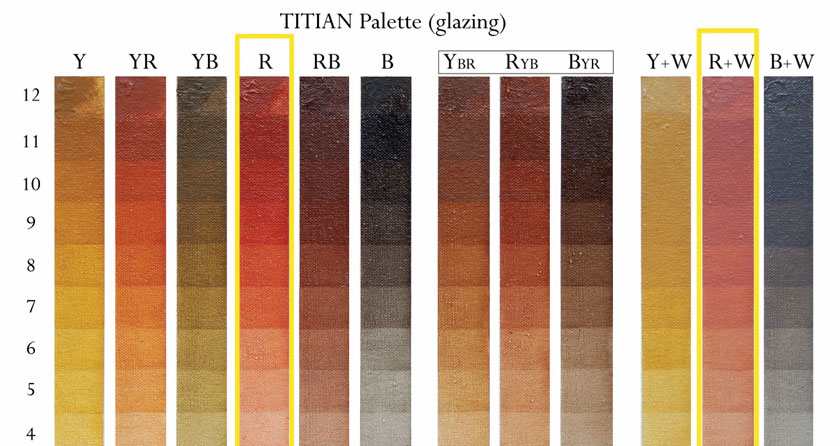
There is a belief that it is possible to glaze only with transparent pigments. Let’s figure out whether this is true. The Titian’s Palette – Yellow, Red, Black and White are all Opaque colors except for Yellow, which is totally transparent. But as you can see on our Glazing Chart, glazes made with such Opaque colors as Venetian Red and Mars Black could also look transparent on the light background. You just need to add more medium to the Paint, and it becomes perfectly suitable for glazing.
I’ll tell you more – even added Titanium White, which is, as you know, enormously opaque – looks perfectly transparent in thin glazes as you see in the first 5-6 steps; however, the thicker the layer of glaze is, the more obvious its opaque nature comes out. Have a look at glazes made with pure Yellow Ochre. Notice how transparent the paint is, even in multiple layers, how intense the color is. And compare the same Yellow Ochre with added White – the thicker layers are, the much more faded and cloudy they look, with no signs of transparency. The Hue has also changed – if transparent glazes appear very hot and reddish in multiple layers, the opaque glazes look cooler and even acquire some greenish color nuances.
We can observe the same story with Red – pure Red and Red-White look more or less similar in first 3-4 steps of glazes; the more layers applied, one over another, the more different they become. Pure Red looks vivid and distinct, but Red-White mix acquires a cloudy, pinkish color. Depending on the effect we would like to achieve, we decide whether our Glazing layers should be clearly transparent or not so transparent but with a turbid effect, the so-called Velaturas. We have to keep in mind that we are looking now at Glazings and Velaturas that are applied on an absolutely white background.
When we have a white or light support, the cloudy semi-transparent layer does not affect the background. How Glazing will affect the painting depends what is under the glaze and how light or dark our Underpainting is.
Now, we can compare two color swatches – Opaque and Glazing. Titian’s Palette applied Opaquely, and generously tinted with White, suits us perfectly for creating initial Underpainting layers. I’ll explain why – all these variations of Tints are dense mixes, with great covering potential – exactly what we need for Underpainting. Moreover, added White is so crucial in Underpainting coolness and pale whitish Tints. Such Underpainting, specially designed with aim to be finished in Glazings, could be precisely called UNDERGLAZING. This term represents the true core of its nature.
The Glazing Palette, with its marvelous, intense, vivid layers of colors, demonstrates the vast variety of options for finishing the painting. By means of Glazes, you will be able to elevate the intensity of painting or on contrary – decrease the intensity. Underglazing is essential for manipulation with Basic Shapes and the Construction of the Composition. Glazings are intended for Tonal and Color manipulation over properly set up Underglazing.
What you need for the task:
- Worksheet #2
- Prepared Support – Canvas, Canvas Board or Oil Painting Paper A3
- Masking tape
- Titanium White
- Venetian Red
- Mars Black
- Yellow Ochre
- Hog or/and Synthetic Brushes + Wide Flat Synthetic Brush for smoothing
- Palette Knife


