Art Lesson 26
This lesson presents an overview of Various Oil Painting Methods
Learn how to paint like the Old Masters!
Old Masters Academy Online Course
Self-study, self-paced online video courseLifetime membershipOne-time payment: $487Enroll Now!Personal Tutoring online + Online Course
Unlimited tutoring by the Academy teachersLifetime membershipOne-time payment: $997Enroll Now!« Back to the Art Lessons List
Various Oil Painting Methods Overview
In this section, you will learn different Oil Painting Techniques that were used by the Old Masters.
We can say that there is one general method the Old Masters used in their paintings. Today, we call this method “The Flemish Method.” This method was named after the country of Flanders, where it developed to its highest point. This is an elaborate, multi-layered approach to oil painting.
Depending on the artist, there are different ways to use the Flemish painting approach. Each Master added his own modified way of painting and developed it even further, sometimes changing the approach during his lifetime. There wasn’t just one universal technique used by all of the Old Masters. So, the term “Flemish Method” is a generalization of all the various methods used by the Masters at that time.
Look at these examples; the same Flemish Method used by Jan Van Eyck differs from Bellini’s, Titian’s, and Rubens’s approaches. Every artist had his own variation. In fact, endless combinations can be used within the Flemish Method.
The main distinct features of the Flemish Method are:
- First, artworks in oils are painted on white backgrounds
- second, the visual appearance of an artwork is created by optical mixing
- and third, this optical mixing is achieved by transparent and semi-transparent glaze layers
To master proficient oil painting skills, you need to study various methods that come from the time of the Old Masters. Your creative style will benefit from the ability to improvise and combine different methods into one painting. Try each painting method that we demonstrate in this section and you may find that some of them work better than others. Eventually, you will find your own way and style of painting.
Understanding these methods will broaden your horizons, and let you “read” the Old Masters paintings with clarity. You will be able to recognize particular techniques used by the Masters.
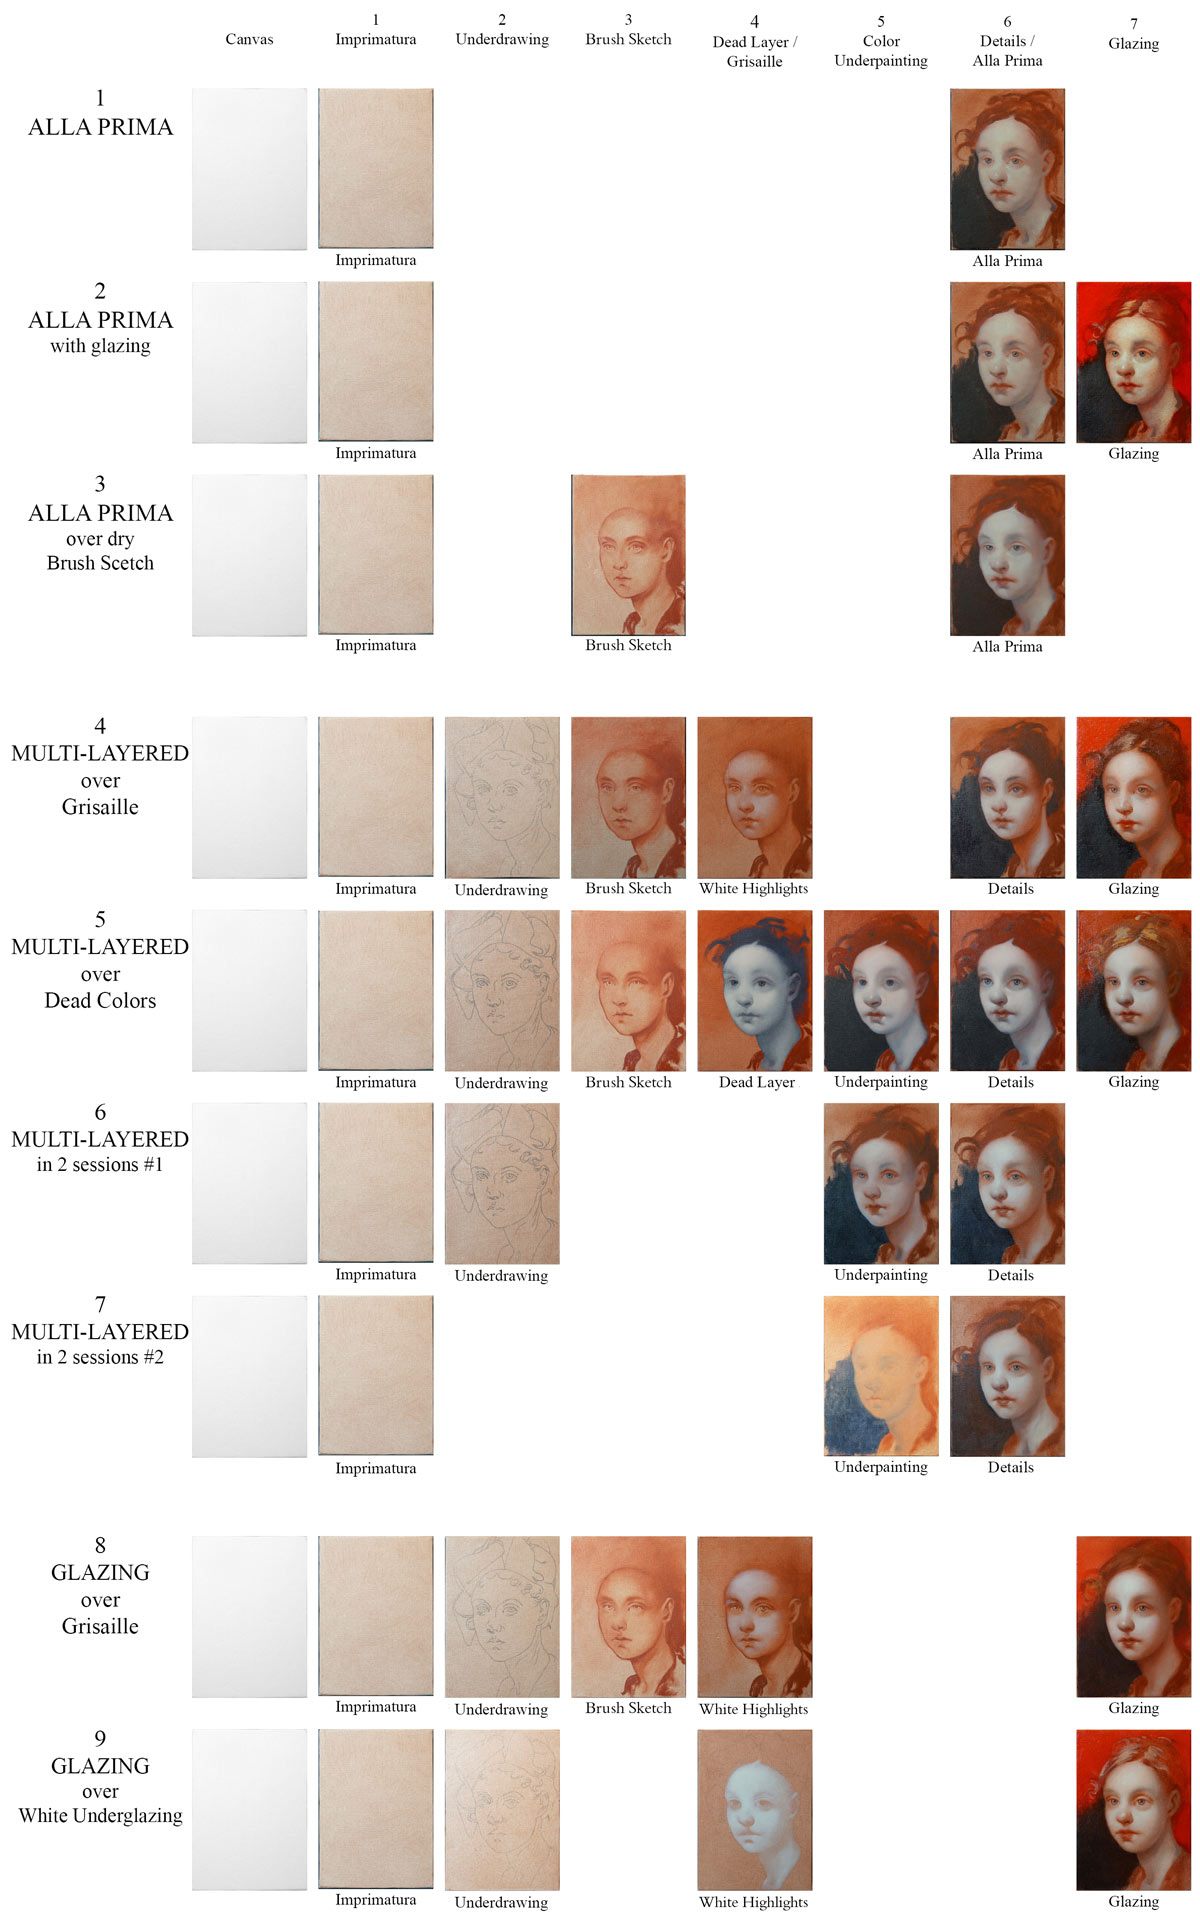
In this chart, you can see all of the oil painting techniques we are going to master in this section. The aim of this chart is to present to you all the steps required for each painting method. There are nine methods and each of them has its own code name, which you can see on the left side of this table.
All nine methods are variations of Flemish Method techniques. They are divided into three groups: Alla-Prima, Multi-Layered, and Glazing.
This chart is actually simpler than it looks. Here is how you can read it. At the top, you will find the names of all the steps that will be used in the painting process. They include:
- Imprimatura
- Underdrawing
- Brush Sketch
- Dead Layer (or Grisaille)
- Color Underpainting
- Details (or Alla-Prima)
- and finally, Glazing layers
As you see, just one method, namely #5, called “Multi-Layered method over a Grisaille,” includes all steps. This is the fullest version of the Flemish painting technique. Other variations have gaps, which mean that some of the steps are not used. However, the key characteristic of the Flemish Method such as White Background is applicable in every case.
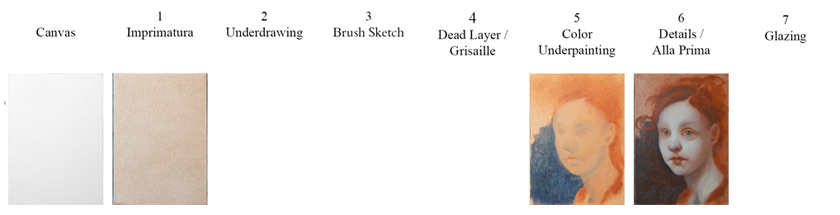
Everything starts with the support; a canvas. White primed canvas is covered with Imprimatura; the next step is Underdrawing, where a preparatory sketch is transferred onto the painting surface. The next step, which is optional, is a Brush Sketch, usually done in Earth Brown colors. In our case, Venetian Red is used for this purpose.
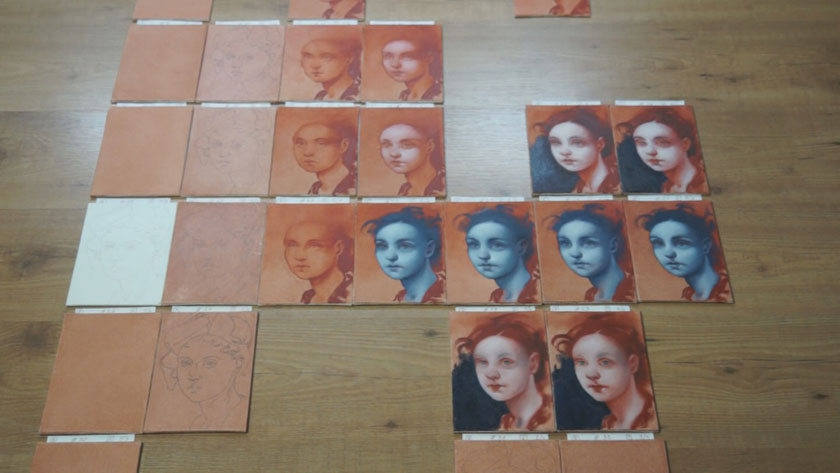
The next step is reserved for a Dead Color Layer, or a similar monochromatic, Grisaille stage of painting. Then follows Underpainting in Colors; however, we call it Underglazing if the painting is completed with glazes. This step is followed by more detailed work in colors; in the case of the Alla Prima method, this is the only step required to create an artwork. And the final step is Glazing, which can enrich the painting and make colors vivid and create irreplaceable optical effects. You need to keep in mind that before moving on to each step, the painting surface has to completely dry. As you can see, it’s possible to skip some of the steps. In each case, you can achieve a different visual result. For practice, we are going to take this drawing sketch and create paintings using different techniques. This is a great exercise to help you understand various options within the Flemish Method.
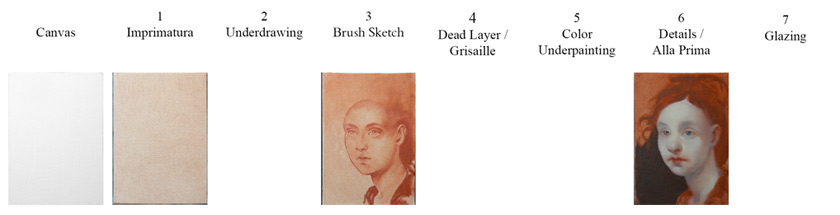
1. Alla-Prima
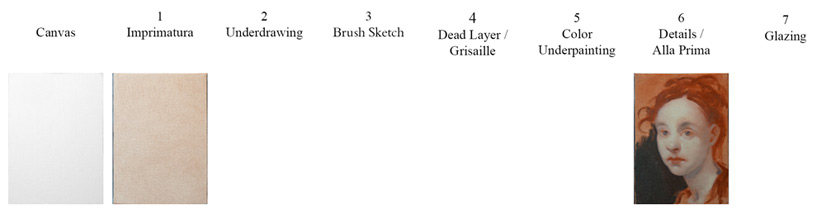
The very first technique we are going to look at is Alla-Prima. This is a very simple way of painting in just one layer. You can even continue to paint the following day, while the paint is still wet; this is why the Alla-Prima method is also called the “wet-on-wet” technique. After drying, the artwork surface forms just one unit layer of paint. Alla-Prima is not a multi-layered method. You see, there is no need to use any Underdrawing, Dead Color layers, or other kinds of Underpainting; we start and finish the painting while the paint is still wet.
2. Alla-Prima with Glazing
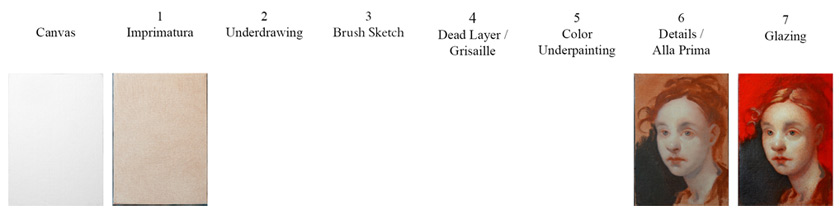
Alla-Prima can be used on its own, but it also works very well with glazing layers on top. Since there is more than one layer that do not intermix with one another, it is no longer Alla-Prima in a strict sense. Therefore, we call this method the “Alla Prima finished with Glazing” to keep the name simple.
3. Alla Prima over dry Brush Sketch
Here, you see another variation of Alla-Prima. It starts with a Brush Sketch over an Imprimatura, so the drawing is ready before you start painting in Alla-Prima. This way, you can concentrate on the colors and tonal values, working over the Brush Sketch.
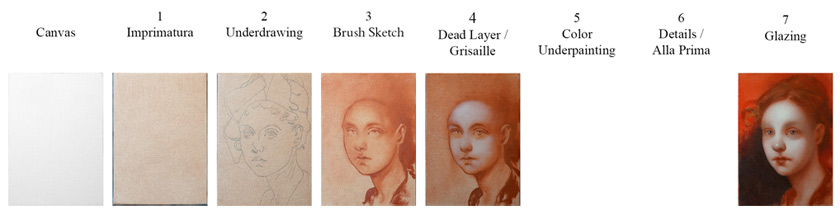
4. Multi-Layered method over Grisaille
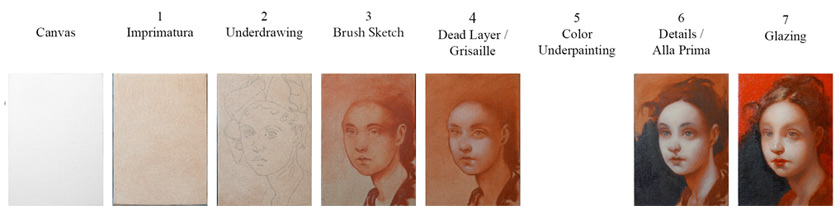
The next method is the proper multi-layered technique. It begins, as usual, with a Brush Sketch over an Underdrawing. Highlights are then indicated with White Grisaille. In one session, the details are painted in colors.
And finally, the painting is completed with thin glazes.
5. Multi-Layered method over Dead Colors
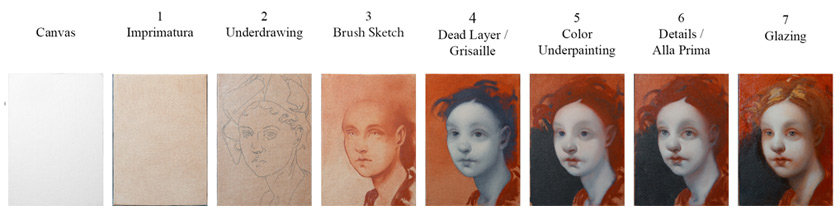
This multi-layered method includes the Dead Color Layers, and is the most comprehensive of all variations. Early Northern Renaissance artists developed this technique to its highest ability. Such painting steps as precise as Underdrawing and Dead Color Layers are very typical for an original Flemish Technique. With time, artists started skipping some steps that initially were essential.
6. Multi-Layered method in two sessions (#1)
In this multi-layered painting technique, a very reduced version of the original Flemish Method is presented. So, there is no Brush Sketch and Dead Coloring; painting starts straight from the Color Underpainting, which can be finished in one or multiple layers. In this version, we stop at this point, omitting the Glazing layers step. However, this method can include glazing as well.
7. Multi-Layered method in two sessions (#2)
This is another version of a two-session multi-layered method. It is very similar to the previous one; however, the Color Underpainting is done differently. It is painted by simply blocking-in color masses. After establishing this minimal Color Underpainting, the rest is painted in one go, wet-on-wet.
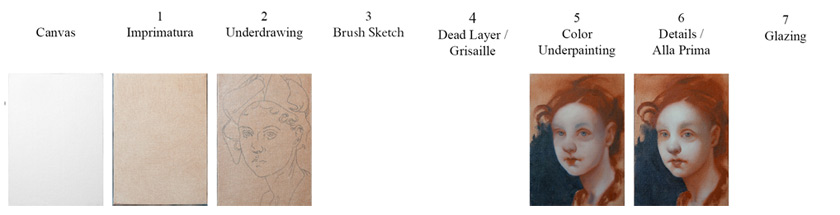
8. Glazing over Grisaille
The two main characteristics of this method are the monochromatic Grisaille and the colorful transparent Glazes. Top layers can also contain semi-transparent Velaturas in combination with transparent Glazes.
9. Glazing over a White Underglazing
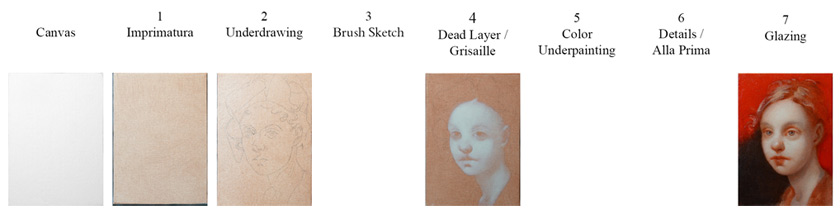
This method is based on two main steps: the Grisaille in White Highlights and the top layers of transparent and semi-transparent Glazings.
If you wonder which method is the best, there is not one definite answer. Many Old Masters used various methods to their best advantage, depending on their personal preferences and creative task. There wasn’t just one universal painting method. If there was just one, the Old Masters would have had a single method that worked for everyone.
Within one particular Flemish Method, endless variations of sub-methods can be created. As we see in the Old Masters example, the Dead Colors Layer that worked perfectly for Van Eyck was modified by Rembrandt, and was completely ignored by Rubens. But still, their personal techniques have common roots in the Flemish Method.
In the last section of the Old Masters .Academy ™, you will see how all these principles of multi-layered painting can be applied in real practice.
Oil Paints Palette:
- White
- Ochre Yellow
- Venetian Red
- Mars Black
- Burned Sienna
- Scarlet Lake
- Payne’s Gray
Paints for Dead Colors:
- White
- Mars Black
- French Ultramarine
Art materials:
- Canvas – 12×18 cm (5×7 inches). You need at least 9 canvas boards for 9 Oil Painting Methods. I recommend that you have spare canvas boards, just in case.
- Low Odor White Spirit
- Paper Tissues
- Stand Linseed Oil
- Kraft Knife
- Willow Charcoal for drawing
- Soft Kneaded eraser
- Picture Varnish (Satin)
- Drawing outline